Site update

This site has been dormant since my last post back in December 2016 but, yesterday, I had to make some upgrades, including the PHP version used on this site. Unfortunately, those upgrades broke a few things—which I fixed just to get the site operational. However, for now, the site is running with a vanilla-style WordPress theme and, no doubt, some old posts need remedial work to fix them (I will get around to that…). However, upgrading/fixing the site re-kindled my interest in writing some new articles which I’ll try to do over the forthcoming weeks (time permitting!).

For several years I had not been checking the contact e-mail address I use for this site—due to the tsunami of junk e-mail, despite efforts to block spam. Now, I’ve simply removed the contact page which is not ideal but if you run a blog you will know the curse of spammers only too well. Sigh. However, I braved the task of checking that backlog list of e-mails (thousands!) and found a few legitimate e-mails that I never replied to, so my sincere apologies for that.

Since my last post I was fortunate to secure a new job with Overleaf where, among other things, I write articles about various TeX-related topics. Here, on this site, I will probably write posts which cover various eclectic topics which reflect whatever has caught my interest at the time.

Until the next post, stay safe and take all necessary precautions to protect yourself from the dreadful coronavirus (COVID-19) pandemic. Cheers!

LuaTeX token library: simple example of scanners to mix TeX and MetaPost

Introduction

In this short article I share the results of using LuaTeX’s token library as one way to intermix TeX and MetaPost code. I used LuaTeX 1.0.1 which I compiled from the source code in the experimental branch of the LuaTeX SVN repository but, I believe, it should also work with LuaTeX 1.0 (may also work with some earlier versions too). In addition, I used luamplib version 2016/03/31 v2.11.3 (I downloaded my copy from github). Note that I do not have a “standard” TeX installation—I prefer to build and maintain my own custom setup (very small and compact).

The LuaTeX token library

I will not try to explain the underlying technical details but simply point you to read this article by Hans Hagen and the relevant section in the LuaTeX Reference Manual (section 9.6: The token library). Here, I’ll just provide an example of using the token library—it is not a sophisticated or “clever” example but one simply designed to demonstrate the idea.

Objective

The goal is to have TeX macros that contain a mixture of TeX and MetaPost code and find a way to expand those macros into a string of MetaPost code which can be passed to LuaTeX’s in-built MetaPost interpreter: mplib.  Suppose, just by way of a simple example, that we defined the following simple TeX macros:

\def\mpbf#1{beginfig(#1);\space}
\def\fc{fullcircle\space}
\def\pp#1#2{pickup pencircle xscaled #1mm yscaled #2mm;\space}
\def\mpef{endfig; end}
\def\draw#1{draw \fc scaled #1;\space}

and we’d like to use them to write TeX code that can build MetaPost graphics. Note that the definition of \draw also contains the command \fc

The scanner

The following code uses LuaTeX’s token library function scan_string() to generate a string from a series of incoming TeX macros—by expanding them. It stores the resulting string into a toks register so that we can later use and obtain the result.

\newtoks\mpcode
\def\scanit{%
\directlua{
local p = token.scan_string()
tex.toks["mpcode"]=p
}}

We could use this macro like this:

 \scanit{...text and TeX macro in braces...}

but instead we’ll add just a little more functionality. Suppose we further define another TeX macro

\def\codetest{\mpbf{1} \pp{0.3}{0.75} \draw{12}\mpef }

which contains a sequence of commands that, once expanded, will generate MetaPost program to produce our graphic. To expand our TeX macro (\codetest) we can do the following:

\scanit{\codetest} and the output is \the\mpcode

Here, the braces “{” and “}” are needed (I think…) in order to make token.scan_string() work correctly (I maybe wrong about that so please run your own tests). Anyway, the \codetest macro is expanded and (due to \scanit) the resulting MetaPost code is stored in the toks register called mpcode. We can see what the toks register contains simply by typesetting the result: doing \the\mpcode—note you may get strange typesetting results, or an error, if your MetaPost contains characters with catcode oddities. You can use \directlua{print(tex.toks["mpcode"])} to dump the content of the mpcode toks register to the console (rather than typesetting it). What I see in my tests is that the mpcode toks register contains the following fully expanded MetaPost code:

beginfig(1); pickup pencircle xscaled 0.3mm yscaled 0.75mm; draw fullcircle scaled 12; endfig; end

And this is now ready for passing to MetaPost (via mplib). But how? Well, one option is to use the package luamplib. If you are using LaTeX (i.e., luaLaTeX format) then you can use the following environment provided by luamplib:

\begin{mplibcode}
...your MetaPost code goes here
\end{mplibcode}

However, our MetaPost code is currently contained in the mpcode toks register. So here’s my (rather ugly hack) that uses \expandafter to get the text out of mpcode and sandwiched between \begin{mplibcode} and \end{mplibcode}. I am sure that real TeX programmers can program something far more elegant!

\def\sa{\begin{mplibcode}}
\def\mcodex{\expandafter\sa\the\mpcode\relax\end{mplibcode}}

Consequently, we  just need to issue the command \mcodex to draw our MetaPost graphic. I hope this is an interesting suggestion/solution that others might find useful.

A note on a “gotcha” when Building TeX Live from source (on Windows) [updated]

Post-publication update: GNU gawk

Since publication of the article below, subsequent investigations with a member of the TeX Live team have identified the exact cause of the problem: An outdated version of GNU’s gawk command-line tool (used during compilation). I had been using version 3.1.7 of GNU’s gawk (supplied with the MSYS distribution I was using) but after updating it to version 4.0.2 the line-ending problem no longer arises. If you are using MSYS on Windows, and want to compile TeX Live…, check the version of gawk installed on your machine. As I say, you live and (re)learn…

Original article

Just a short note to share the solution to a problem I experienced when trying to compile Tex Live from the C/C++ source distribution… on Windows. I have a bit of relevant experience because I regularly compile LuaTeX from source and have built other TeX engines–including Knuthian TeX from raw WEB code and some versions of XeTeX.

So, with that experience, I decided to have a go at building TeX Live from the source file distribution–it’s useful to be able to build and use the latest versions of TeX-related software. Using SVN (via the Tortoise SVN client) I checked out the TeX Live source directory and tried to build it using MinGW64/MSYS64. I read through the notes in README.2building (supplied with the TeX Live source) and followed the example to build dvipdfm-x. Running the Build/configure scripts (using the --disable-all-pkgs option) worked fine but, sadly, compilation failed with a cascade of errors… so I wanted to find out why.

Unquestionably, TeX Live is a truly impressive work of considerable complexity and, of course, it should build OK on Windows–so I figured that the problem must be a relatively minor one to do with my setup. However, tracking it down initially felt like “looking for a needle in a haystack”, to quote a well-known English figure of speech. Well, after a couple of days I found the problem… line endings in some key text files! When I checked out the source via SVN some key files (config.h.in and similar *.in files) had been saved with Windows line endings (CR+LF) rather than Linux endings of LF only. Running the top-level TeX Live Build/configure scripts generates a config.status shell script file for each component/sub-system that has to be compiled. As the config.status scripts execute, they create a number of temporary files which are processed and deleted on-the-fly. To stop these temporary files being deleted (to assist my bug hunt) I used a simple trick of adding the line alias rm='echo' at the start of one of the config.status shell scripts (which are generated by configure).

I discovered that the config.status scripts generate a temporary file called defines.awk–which is a script designed to be executed by the AWK program. The purpose of defines.awk is to process “template” configuration files (called config.h.in (and similar)) to generate various config.h files that contain important settings (#defines) detected during the configuration process (i.e., during the execution of configure). These config.h files vary for each program you are building and are essential for successful compilation. Well, it turned out that the defines.awk script was failing to correctly parse the config.h.in files (and similar) simply because the Windows line endings were causing a vital regular expression (in defines.awk) to fail. This resulted in the config.h files being a copy of config.h.in because none of the text replacements had worked due to failure of the AWK regular expression. Not surprisingly, erroneous config.h files caused the spectacular failure of compilation I experienced on my first attempt. Re-saving the config.h.in files (and some other *.in files) with Linux line endings seems to have solved the problems.

And yes, so far all the TeX-related programs I have tried to build have compiled successfully. This is not the first time I have been “bitten” through problems caused by Linux/Widows line endings… so I guess you always live and (re)learn.


Lua-scriptable PATGEN – i.e., PATGEN 2.4 with a Lua binding…

PATGEN: from WEB to C

I recently became curious about TeX’s hyphenation patterns and started to read about how they are created – usually using PATGEN though, from what I’ve read, some brave souls do actually hand-craft hyphenation patterns! I decided to build PATGEN 2.4 from source code which, of course, means converting the PATGEN WEB source to C code via Web2C. Some time ago I went through the process of building my own Web2C executable for Windows (see this article for more details). I won’t go into the specifics of doing the conversion but I was able to create patgen.c – the resulting C code is less than 2,000 lines long. I also spent some time re-formatting the C code simply because the Web2C process of machine-generated C does not aim for beauty, just functionality. I removed all dependencies on Kpathsea and generally tidied the code to create clean, stripped-down code that is easy to compile.

Understanding PATGEN: not so easy

PATGEN is, of course, a very highly specialized program and one that is designed for expert users who really need to use it. As a non-expert looking to understand just the basics I found that there was very little step-by-step “beginners” material – although a search on tex.stackexchange.com provided some useful “snippets” and the tutorial “A small tutorial on the multilingual features of PatGen2” by Yannis Haralambous was very helpful. There are, of course, a number of articles, by luminaries and experts, on specific uses of the PATGEN program; however, for me anyway, it was a case of piecing together the puzzle… reading the PATGEN documentation, source code plus some parts of Frank Liang’s thesis Word Hy-phen-a-tion by Com-put-er which describes the hyphenation algorithms that PATGEN implements.

Running PATGEN

To run PATGEN you need to provide it with the names/paths of (up to) four files (some can be “nul” if you are not using them):

PATGEN dictionary_file starting_patterns translate_file output_patterns

TIP: I created a PDF file of PATGEN’s documentation that you can download here. Some information on the files you provide to PATGEN are discussed in sections 1 to 6 in the first few pages of the documentation.

In very brief outline, the files you provide on the command line are

  • dictionary_file: A pre-prepared list of hyphenated words from which you want to generate hyphenation patterns for TeX to use.
  • starting_patterns: (can be “nul”, i.e., it is not mandatory) Best to read the description(s) in the documentation (link above).
  • translate_file: (can be “nul”, i.e., it is not mandatory) From the documentation “The translate file may specify the values of \lefthyphenmin and \righthyphenmin as well as the external representation and collating sequence of the `letters’ used by the language. It also specifies other information – see the documentation for further details (section 54).
  • output_patterns: the output from PATGEN – a file of hyphenation patterns for use with TeX.

PATGEN: questions, questions…

In order to work its magic, PATGEN makes multiple passes through the dictionary_file as it builds the list of hyphenation patterns. As it performs the processing PATGEN stops to ask you for input: it needs your help at various stages of the processing. Now, I’m not going to go into the details of those questions simply because I’m not sufficiently experienced with the program to be sure that I’d be giving sensible advice. Sorry :-(.

Answering questions via Lua

So, finally, to the main topic of this post. As noted, during processing PATGEN asks you to provide it with some information to guide the pattern-generation process: those details concern the hyphenation levels, pattern lengths plus some heuristics data that assist PATGEN to choose patterns. Ultimately, the answers you give to PATGEN are integer values that you enter at the command line. However, it’s a bit frustrating to keep answering PATGEN’s questions so I wondered if it would be possible to “automate” providing those answers and, in addition, create a Dynamic Link Library (DLL) that I could use with LuaTeX – perhaps something very basic to start with, like this:


\directlua{
local pgen=require("patgen")
pgen.setparams(...)
local patterns=pgen.run()

}

In the above code, require("patgen") will load a DLL (patgen.dll) and return a table of functions that let you set various parameters for PATGEN and then run it to return the pattern list as a string that you can subsequently use with LuaTeX. Note, LuaTeX does NOT require INITEX mode to use hyphenation patterns.

Calling Lua code (functions) from patgen.dll

The above simple scenario does indeed work and it’s quite easy to implement this. Firstly, within PATGEN’s void mainbody(void) routine you can replace the code that stops to ask you questions – such as the request for the start/finish pattern lengths:


Fputs(output, "pat_start, pat_finish: ");
input2ints(&n1, &n2);

The above code uses a function input2ints (int *a, int *b) to request two integers:


void input2ints (int *a, int *b)
{
int ch;
while (scanf (SCAN2INT, a, b) != 2)
{
while ((ch = getchar ()) != EOF && ch != '\n');
if (ch == EOF) return;
fprintf (stderr, "Please enter two integers.\n");
}
while ((ch = getchar ()) != EOF && ch != '\n');
}

You can replace this with your own function, say get_pattern_start_finish(&n1, &n2) which can, for example, call a function in your Lua script to work out the values you want to return for n1 and n2 (values for pat_start, pat_finish). Perhaps you might store those values in Lua as a table. At the time of writing I’ve not yet written that part but, at the moment, from the Lua/C module I just return some hardcoded answers. The next step simply requires making a call from the Lua C API to a named Lua script function that works out the values you want to provide. This gives the most flexibility because the logic is all contained in your Lua code which, of course, makes it very quick and easy to experiment with different settings to generate different patterns. This technique can also be used for other parameters that PATGEN asks for.

Returning the generated pattern(s)

Within PATGEN, there is a function called zoutputpatterns(...) which generates the hyphenation patterns and writes them out to a file. I’m experimenting with a function which “wrappers” this into another function that uses a C++ stringstream object to capture/save the pattern text – rather than writing it to a file. To do this simply required modifying zoutputpatterns(...) to pass in the stringstream object and output patterns (character data) to the stringstream rather write the data than a physical file. Once finished, you can then get access to the stringstream’s stored data as a C-style string (containing the generated hyphenation patterns) which you can return to Lua, thus to LuaTeX.


using namespace std;
void do_output_patterns(int i, int j)
{
std::stringstream *ss;
ss=new std::stringstream();
zoutputpatterns (i , j, ss) ;
std::cout << ss->str().c_str() << endl; //you can then pass the string of patterns back to Lua and thus LuaTeX
delete ss;
}

In conclusion

This is just a quick summary of a work-in-progress but it looks like it will provide a nice way for fast/rapid experimentation with PATGEN. It seems to offer dynamic generation of hyphenation patterns and provides a method to fully script PATGEN’s activities and thus very quickly understand the effect of the parameters PATGEN asks you to provide. If there is any interest I might (eventually) release it once I’m happy that it’s good enough.

Building LuaTeX 0.80 on Windows and debugging with Eclipse IDE

Long time, no posts!

It’s been a very long time since my last post, some 8 months, so I thought it was about time I posted something new. At the moment, I’m currently looking for new contract work (or employment opportunities) within STM publishing so, for a while, I have some time to devote to my blog.

A new LuaTeX beta (version 0.80) was released on 13 June 2015 and, as usual, I wanted to compile LuaTeX from source code. I grabbed a copy of LuaTeX’s source from the subversion repository – on Windows I use the excellent, free, TortoiseSVN software to create my local repository. To create a local repository with TortoiseSVN you use the URL https://foundry.supelec.fr/svn/luatex/tags/beta-0.80.0

Compilation failed: time for an update of MinGW/MSYS

At first I could not get a successful compilation of LuaTeX 0.80 even though the prior release (0.79.3.1) compiled perfectly. Note that this failure to build LuaTeX 0.80 could simply be due to a problem with my local setup and others might not experience it: I’m merely documenting what I did to fix my own issues with the build. After some discussions with a member of the LuaTeX development team I decided it was time to do a fresh/updated install of the tools you need to compile LuaTeX – MinGW and MSYS, which provide the compiler, libraries, Bash shell and other tools/utilities.

Which ones did I use?

I decided to use the following versions of MinGW and MSYS:

Notes on installation

Installing mingw-w64 just requires running the .exe provided. To install MSYS you simply unpack the file MSYS-20111123.zip. I chose to install mingw-w64 and MSYS on my E: drive in directories called MinGW64 and MSYS respectively. Once you’ve installed MSYS you need to run a small “post installation” batch file called pi.bat which is located in the postinstall subdirectory of your MSYS folder (e.g,. e:\msys\postinstall\pi.bat). This batch file asks a couple of simple questions to “link up” your MinGW installation and your MSYS installation. After installing mingw-w64 and MSYS I was able to build LuaTeX 0.80 without any difficulties. Note that you will probably need to update your system’s PATH environment variable to include the location of the directories which contain the numerous executables provided by mingw-w64 and MSYS.

Next step: Grab the LuaTeX code

As noted, you’ll need an SVN client to checkout your own local copy of the LuaTeX repository. I used TortioseSVN and the aforementioned URL: https://foundry.supelec.fr/svn/luatex/tags/beta-0.80.0 Let’s assume you successfully downloaded LuaTeX’s source code into a repository directory called, say, e:\luatex\beta-0.80.0. The next step is to start the MSYS Bash shell by double-clicking on the batch file msys.bat located in the root of your MSYS folder. With the Bash shell running, change your current directory by issuing the command cd e:/luatex/beta-0.80.0

Running the build script: build.sh

Located within the e:\luatex\beta-0.80.0 directory is a file (Bash shell script) called build.sh which you execute to perform the compilation process (i.e., it calls configure and make). If you look inside build.sh you’ll observe there are several command-line options you can give to the script but I’m not going to cover those here – apart from the --debug option which I’ll discuss in a moment. To execute the script you just need to type ./build.sh press return and, hopefully, the build will start. Depending on the options you give to the build script the build process can take quite a long time. On my Intel i7 (6 core) machine (with 16GB memory) it can take as long as 20 minutes for a full build.

Using build.sh –debug

As you might have guessed, running the build.sh script with the --debug option (./build.sh --debug) creates a version of the luatex.exe executable that contains a wealth of additional information which provides GNU’s debugger (gdb) with the information it needs in order to run the executable for debugging purposes. Just to note that, at the time of writing, the non-debug luatex.exe file (on Windows) is approximately 8MB, but the debug version explodes in size to something like 325MB! (again, on Windows). This has been reported to the LuaTeX team and is presently being investigated.

Now the fun stuff: debugging luatex.exe

LuaTeX is a large and very complex piece of software which makes use of many C/C++ libraries, including: FontForge, Cairo, MetaPost, GNU numerical libraries, libpng, zlib and others – all in addition to its own code base plus, of course, the Lua scripting language. It’s really quite an amazing feat of programming to glue all these libraries together. If, like me, you are interested to see how LuaTeX works “under the hood”, the only way to really achieve that is to create a debug version of LuaTeX (noted above) and run it using the GNU debugger (gdb) – the GNU debugger is installed as part of the mingw-w64 distribution.

I prefer a Visual Debugger

Of course, it’s quite possible to use the GNU debugger via a command line but after years of Using Microsost Visual Studio I very much prefer using a graphical interface to set breakpoints, single-step through code, examine variables etc – all the things you do as part of a debug session. However, we’ve built the luatex.exe (debug version) through a script, using GNU compilers, and we don’t have a nice Visual Studio project we can use: so how can we have the pleasures of a GUI-based debugging session? Well, there’s some great news: you can! The Eclipse IDE (Integrated Development Environment) has a fantastic feature that let’s you import an executable (debug version) and automatically creates a project that lets you use GNU’s gdb within a nice GUI world – you can single step through the original C/C++ code, and work just as you would in a typical Visual Studio world. It’s really quite amazing and is possible because the debug version of luatex.exe is expanded to provide/include the additional information that lets you do this.

Installing Eclipse on Windows

Eclipse is built in Java so you’ll first need to ensure you have Java (and the Java Development Kit) installed before you try to install Eclipse. I already had 32-bit Java installed but I decided to install the 64-bit version (keeping the 32-bit version) – all I did was to install the 64-bit Java version in a different directory. Again, you might need to update your system’s PATH environment variable so that it can find Java executables.

Which Eclipse?

You need the Eclipse IDE for C/C++ Developers. The latest version is, at the time of writing, available here (again I opted for the 64-bit version). Now I must confess that I did encounter a few minor issues with trying to configure Eclipse and telling it to use to use the compiler setup provided by mingw-w64. Such issues can be very dependent on your local setup so I won’t go into the details. However, if, like me, you do encounter difficulties trying test the Eclipse install (compiling a simple test C program with the GNU compiler) then be patient and Google for help + tips because most issues are likely to have been noted/discussed somewhere on the web.

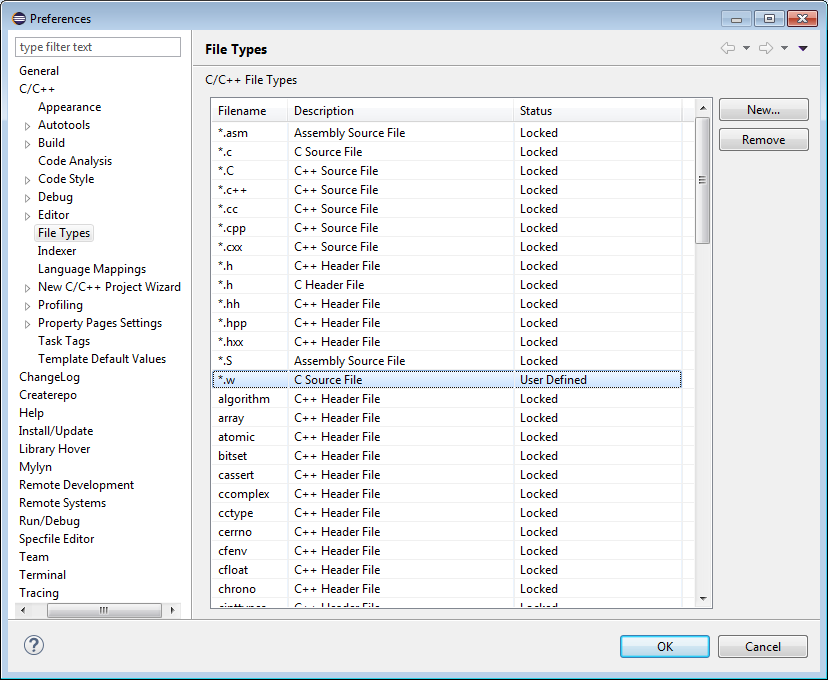
A TIP I can offer: .w source file extensions

One particular issue you might hit when trying to debug LuaTeX with the GNU debugger (gdb) is the strange source file extension used by some source files in the LuaTeX code base. Much of core LuaTeX is written in CWEB, which is the C-code version of Knuth’s venerable WEB (structured documentation) format. CWEB code is a mixture of C program code and TeX documentation code. During the build process a program called CTANGLE processes the .w files to generate the C source for compilation. However, the debug executable contains references to these .w source files but Eclipse needs to be told that files with a .w extension are source files, otherwise Eclipse and the GNU debugger (gdb) get “confused” and claim they can’t find the .w source files – meaning you can’t step into the source code. All I did was (within Eclipse) to set up .w as a source file type under Window --> Preferences --> C/C++--> File Types as shown in the screenshot below.

And finally: opening luatex.exe with Eclipse

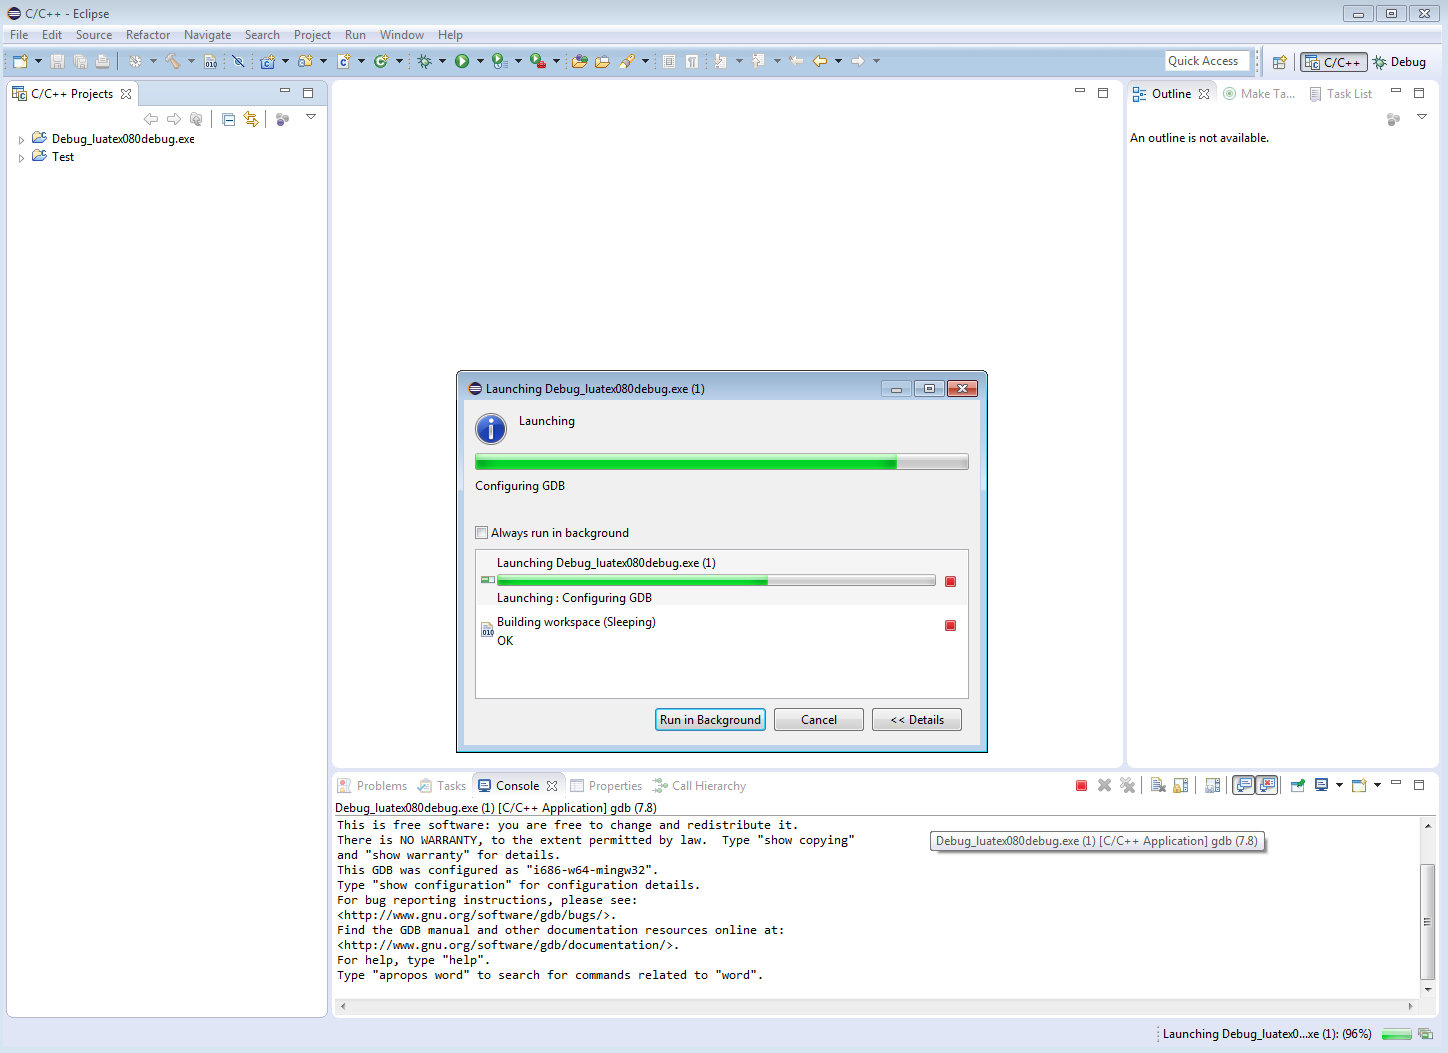
From the Eclise menu, choose File --> Import and select C/C++ Executable. Click “Next” then “Browse” to locate the debug version of the LuaTeX executable you built earlier (Note: here I’ve named my executable file as luatex080debug.exe). From then on, just continue with the import process – for now, during the import process I just accepted the default options offered by Eclipse (you can read-up later). Once Eclipse is ready, click “Debug” in the final step and the debug version of the executable will be examined and parsed to extract all the information it contains and from that data Eclipse will build you a project for debugging LuaTeX, complete with access to all the source code for you to set breakpoints and step through at your leisure. How amazing is that!

The debug executable being parsed by gdb and Eclipse building your debugging project:

The Eclipse IDE debugging LuaTeX using GNU gdb debugger

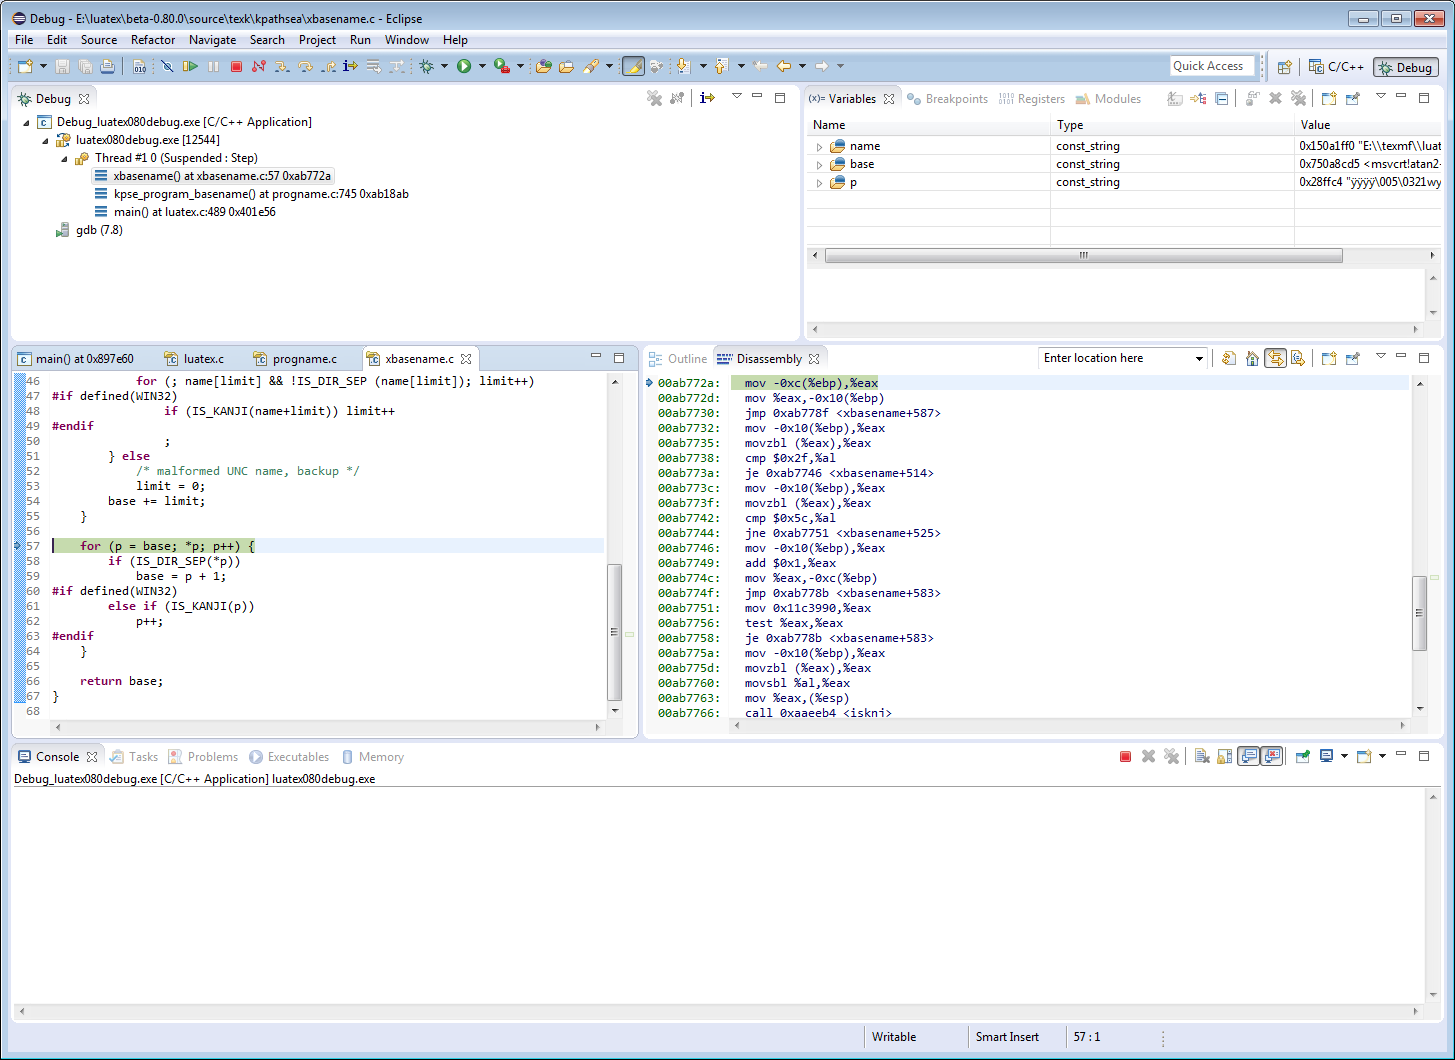
Single-stepping through LuaTeX’s source code in Eclipse 🙂

The Eclipse IDE debugging LuaTeX using GNU gdb debugger