DTL OTMaster: A superb tool to help understand the OpenType font file format

Introduction

Microsoft’s official specification for the OpenType font file format is a somewhat dry and, of course, a very technical document. Reading through it is not a task for the faint-hearted! I’m interested to understand some parts of it so I recently purchased a copy of DTL OTMaster which has proved to be absolutely invaluable. At the time of writing DTL OTMaster costs about 250 euros but the time it can save you makes it worth every penny. This post is not intended as an “advert” for the software, just a quick demo of a really great tool that you may not have heard of; so here are some screenshots of what it will show you. In the screenshots below, OTMaster is displaying the open source OpenType (TrueType) font Scheherazade .

Screenshots

Here are some screenshots showing the internals of Scheherazade. Programmers will note that you are provided with information on the data types of various entries – the same data types referenced in Microsoft’s specification. Very useful indeed! It’s worth noting that OTMaster has many other features in addition to displaying the technical data – including some features present in Microsoft’s VOLT – and in some areas they are better implemented than in VOLT, particularly the ability to preview multiple glyphs with mark-to-base positioning.

The “root”

On the left is the internal font structure: at the top is the “root” entry where you can see the glyphs in the font.

Summary information

Summary of key data contained at the start of the font.

cmap table

The following screenshot shows the font cmap table(s) – the font’s mechanism to map from character codes (e.g., Unicode) to the internal, and font-specific, glyph identifiers (indices).

glyf table

Displaying a wealth of information on the low-level data for glyphs.

Example of adjusting Arabic vowel positions

Follow-up example to the previous post

A slightly more intricate example, this time showing the “before and after” effect of vowel adjustments. Again, this was achieved with a HarfBuzz-based pre-processor.

TeX file generated using HarfBuzz

Again, TeX code shown on individual lines for greater clarity.


\XeTeXglyph609 
\hbox to 0pt{\special{color push rgb 0 0 1}\XeTeXglyph911 \special{color pop}}
\hbox to 0pt{\vbox{\nointerlineskip\moveright 6.53bp\hbox{\raise-2.71bp\hbox{\special{pdf: content q 0.25 w 0 0 m -0.37 14.60  3.69  4.38 re S Q}\XeTeXglyph911 }}}}
\XeTeXglyph831 
\hbox to 0pt{\special{color push rgb 0 0 1}\XeTeXglyph907 \special{color pop}}
\hbox to 0pt{\vbox{\nointerlineskip\moveright 3.56bp\hbox{\raise-4.82bp\hbox{\special{pdf: content q 0.25 w 0 0 m -0.72 14.60  4.73  3.31 re S Q}\XeTeXglyph907 }}}}
\XeTeXglyph263 
\XeTeXglyph3 
\XeTeXglyph436 
\hbox to 0pt{\special{color push rgb 0 0 1}\XeTeXglyph907 \special{color pop}}
\hbox to 0pt{\vbox{\nointerlineskip\moveright 1.82bp\hbox{\raise-3.24bp\hbox{\special{pdf: content q 0.25 w 0 0 m -0.72 14.60  4.73  3.31 re S Q}\XeTeXglyph907 }}}}
\XeTeXglyph489 
\hbox to 0pt{\special{color push rgb 0 0 1}\XeTeXglyph911 \special{color pop}}
\hbox to 0pt{\vbox{\nointerlineskip\moveright 3.47bp\hbox{\raise-4.35bp\hbox{\special{pdf: content q 0.25 w 0 0 m -0.37 14.60  3.69  4.38 re S Q}\XeTeXglyph911 }}}}
\XeTeXglyph755 
\hbox to 0pt{\special{color push rgb 0 0 1}\XeTeXglyph907 \special{color pop}}
\hbox to 0pt{\vbox{\nointerlineskip\moveright 2.20bp\hbox{\raise-2.64bp\hbox{\special{pdf: content q 0.25 w 0 0 m -0.72 14.60  4.73  3.31 re S Q}\XeTeXglyph907 }}}}
\XeTeXglyph896 

Download PDF

Colouring Arabic vowels with XeTeX and a HarfBuzz pre-processor

Introduction

Using an external pre-processor (built using HarfBuzz) you can achieve affects that are not possible (or, at least, not easy) directly with XeTeX. Here’s a simple example of colouring Arabic vowels – this example is likely to be possible with XeTeX alone, but it’s just a quick demo – many other interesting possibilities come to mind. At the moment the Arabic string is hardcoded into the pre-processor, just for testing, but I plan to make it read from files output by XeTeX – it’s just a proof of concept. The vowel positioning was achieved by putting the vowel glyphs in boxes and shifting them according to the anchor point data provided by HarfBuzz.

My test document

\documentclass[11pt,twoside,a4paper]{book}
\pdfpageheight=297mm
\pdfpagewidth=210mm
\usepackage{fontspec}
\usepackage{bidi}
\begin{document}
\pagestyle{empty}
\font\scha= "Scheherazade" at 12bp
\font\schb= "Scheherazade" at 30bp
\scha \noindent Here, we compare the Arabic text contained in our \XeTeX\ file to the text which is
output directly via a HarfBuzz pre-processor and input into our document from "harfarab.tex"\par\vskip10pt
\schb
\noindent \hbox to 150pt{Actual text:\hfill} \RL{هَمْزَة وَصْل}\par
\noindent \hbox to 150pt{Processed text:\hfill} \input harfarab.tex
\end{document}

harfarab.tex output via HarfBuzz

Displayed here on individual lines for readability.

\XeTeXglyph609
\hbox to 0pt{\vbox{\moveright 6.53bp\hbox{\raise-2.71bp\hbox{\special{color push rgb 0 0 1}\XeTeXglyph911 \special{color pop}}}}}
\XeTeXglyph831
\hbox to 0pt{\vbox{\moveright 3.56bp\hbox{\raise-4.82bp\hbox{\special{color push rgb 0 0 1}\XeTeXglyph907 \special{color pop}}}}}
\XeTeXglyph263
\XeTeXglyph3
\XeTeXglyph436
\hbox to 0pt{\vbox{\moveright 1.82bp\hbox{\raise-3.24bp\hbox{\special{color push rgb 0 0 1}\XeTeXglyph907 \special{color pop}}}}}
\XeTeXglyph489
\hbox to 0pt{\vbox{\moveright 3.47bp\hbox{\raise-4.35bp\hbox{\special{color push rgb 0 0 1}\XeTeXglyph911 \special{color pop}}}}}
\XeTeXglyph755
\hbox to 0pt{\vbox{\moveright 2.20bp\hbox{\raise-2.64bp\hbox{\special{color push rgb 0 0 1}\XeTeXglyph907 \special{color pop}}}}}
\XeTeXglyph896

The resulting PDF

As you can see, the results are identical – as you’d expect since they both use the HarfBuzz engine, one internally to XeTeX, the other externally in a pre-processor.

Download PDF

Building HarfBuzz as a static library using Microsoft Visual Studio

Introduction: A very brief post

This is an extremely short post to note one way of building the superb HarfBuzz OpenType shaping library as a static library on Windows (i.e., a .lib) – using an elderly version of Visual Studio (2008)! The screenshot below shows the source files I included into my VS2008 project and the files I excluded from the build (the excluded files have a little red minus sign next to them). In short, I did not build HarfBuzz for use with ICU, Graphite or Uniscribe and excluded a few other source files that were not necessary for (my version of) a successful build. I’ve tested the .lib and, so far, it works well for what I need – but, of course, be sure to run your on tests! You will also need the FreeType library as well, which I also built as a static library. HarfBuzz also compiles nicely using MinGW to give you a DLL, but I personally prefer to build a native Windows .lib if I can get one built (without too much pain…)

Here are the preprocessor definitions that I needed to set for the project

WIN32
_DEBUG
_LIB
_CRT_SECURE_NO_WARNINGS
HAVE_OT
HAVE_UCDN

A tip, of sorts, or at least something that worked for me. When using the HarfBuzz library UTF16 buffer functions in your own code, you may need to ensure that the wchar_t type is not treated as a built-in type. For example, using wide characters like this const wchar_t* text = L"هَمْزَة وَصْل آ"; and, say, hb_buffer_add_utf16( buffer, text, wcslen(text), 0, wcslen(text) );. Within the project property pages, Set C/C++ -> Language -> Treat wchar_t as Built-in Type = No

Here’s the list of files displayed in Visual Studio

Simple tutorial on processing Arabic text using libotf under Windows

Notes and comments are inline with the C code

A fairly basic example to explain a bit about libotf: just to “get started”. To run this, I built libotf (and FreeType) as static libraries and linked against them.

#include <windows.h>
#include <math.h>
#include <malloc.h>
#include <memory.h>
#include <stdio.h>
#include <stdlib.h>
// I'm including FreeType #includes directly not via #include FT_FREETYPE_H
#include <ft2build.h>
#include <freetype.h>
#include <t1tables.h>
#include <ftoutln.h>
#include <ftbbox.h>
//#include FT_FREETYPE_H
#include <otf.h>
//#include <pcre.h>
//#include <time.h>

typedef unsigned char uint8_t;
typedef unsigned int  uint32_t;

int main(int argc, char** argv)
{

FT_Library       font_library;
FT_Face          fontface;
FT_GlyphSlot     cur_glyph;
FT_Glyph_Metrics glyph_metrics;
OTF_GlyphString gstring;
char * fontpath;
size_t numcodepoints;
OTF *otf;
int i;

// "arabictext" is a "wide character" string. It contains a sequence of Unicode codepoints
// for each character in our string. BUT NOTE: these codepoints will be the values of the
// UNSHAPED isolated Arabic characters. What you are looking at on screen here is the result of
// applying the operating system/browser shaping engine to shape the displayed version. 
// It is really important to understand that !!

wchar_t * arabictext = L"حَرَكَات";

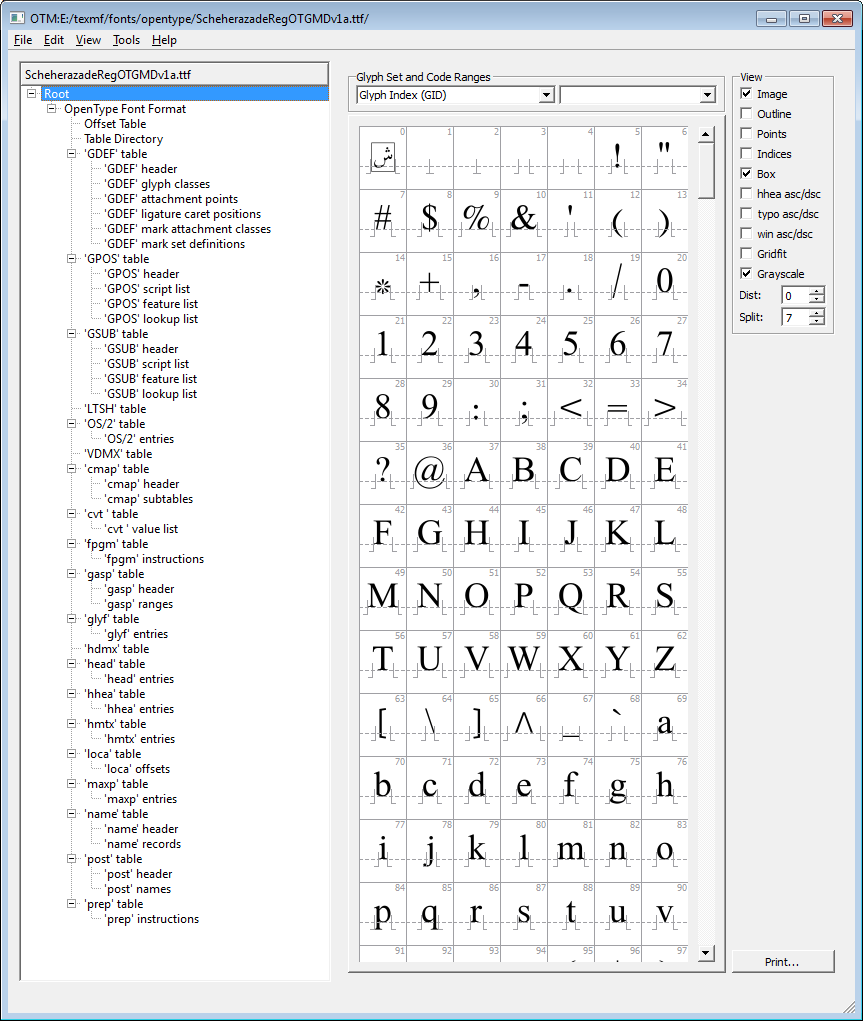
// I'm using the Scheherazade font from SIL (as amended by me)
fontpath="e:\\Volt\\ScheherazadeRegOT-1.005-developer\\sources\\ScheherarazadeGDversion3.ttf";

// wcslen returns the string length in "wide character" units
// i.e., this gives you the number of Unicode codepoints (i.e., characters). 
// Obviously, if "arabictext" was encoded in UTF-8 (e.g., we read it from a file)
// we'd need to counts the number of codepoints by converting the UTF-8
// back into Unicode character integers (codepoints)

numcodepoints= wcslen(arabictext);

// gstring is the object we pass to the OTF library.
// First we need to tell it how long our gstring is.
// Initially, gstring.used = gstring.size until the libotf library starts to
// manipulate the gstring (glyph sequences) and perform various OpenType 
// features/lookups (e.g., GSUB subsitutions) which usually results in 
// changes to the number of glyphs present in the string.
// OK, here's where we set up the gstring for use with the OTF library

gstring.used=numcodepoints;
gstring.size=numcodepoints;

// Now we need to create our actual glyph objects
// 1 for each codepoint in our text wchar_t * arabictext

gstring.glyphs= malloc (sizeof (OTF_Glyph) * numcodepoints);
memset (gstring.glyphs, '\0', sizeof (OTF_Glyph) * numcodepoints);

// Now we are ready to use the OTF library. I should make it VERY clear
// that here we are NOT, I repeat NOT doing any shaping of the Arabic
// text. libotf does not transform the string of isolated Arabic glyphs form into their
// initial, medial or final shapes. That must happen BEFORE you pass the 
// gstring to libotf. The following is just a trivial demo showing the basics.

// Firstly, we need to assign the Unicode codepoint (character value) 
// to each of the glyphs in our gstring object --- setting gstring.glyphs[i].c for glyph i.
// (as contained in arabictext[i])
 
for (i=0; i < numcodepoints; i++)  {
	gstring.glyphs[i].c = arabictext[i];
}

// Get our instance of the libotf library
// You should check the return value: Warning, I'm being VERY lazy here!!!
otf = OTF_open(fontpath);

// Now we'll call the really interesting functions. 

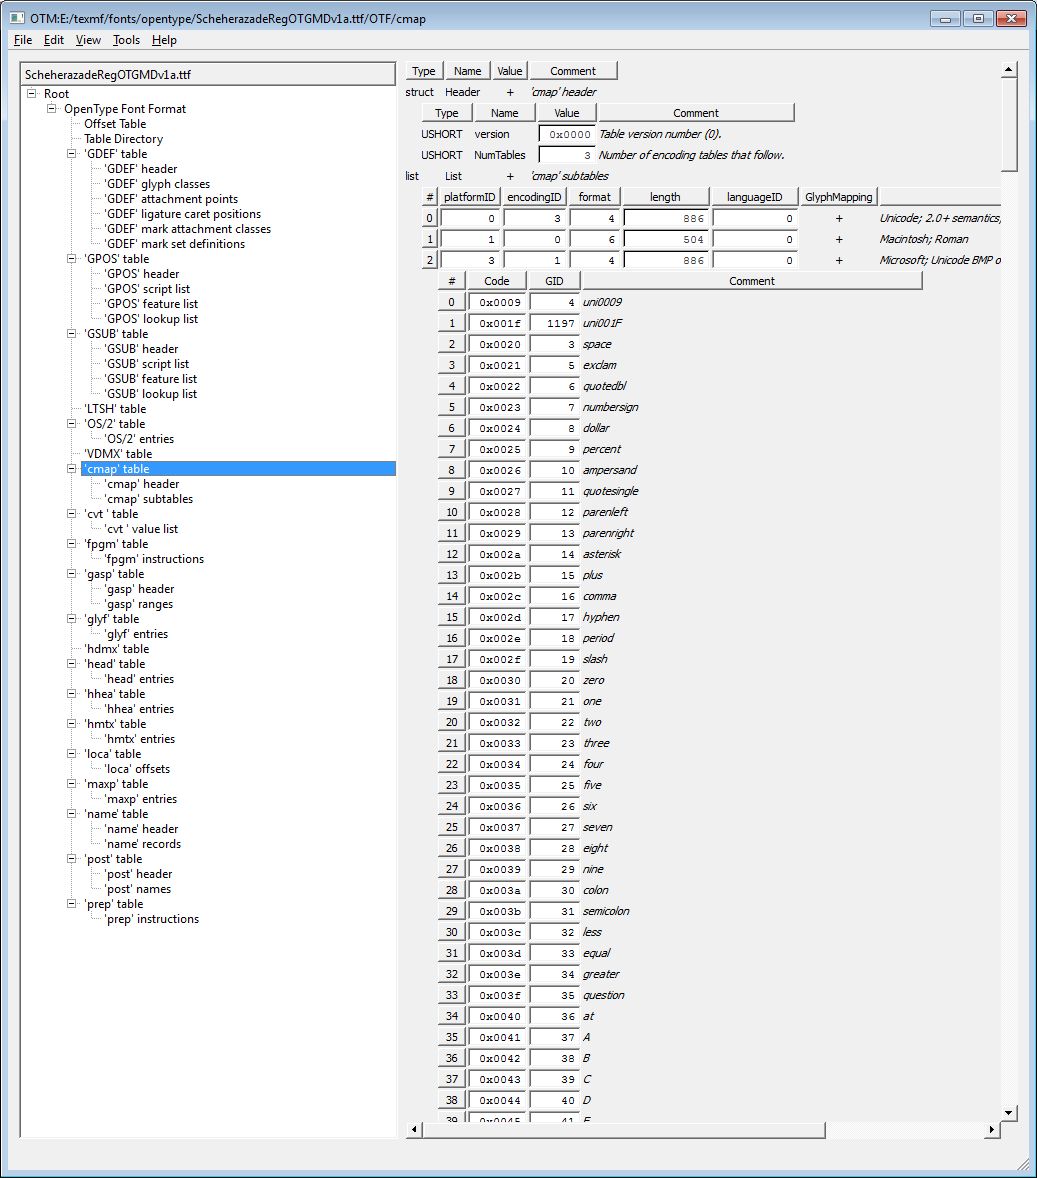
// Firstly, we'll call OTF_drive_cmap2 (otf, gstring, 3, 1)
// to assign GLYPH IDENTIFIERS to our gstring. What's happening is that libotf is 
// using the CMAP table in the font to say "Hey, I've got the Unicode code point X
// can you tell me the GLYPH IDENTIFIER that maps to in the font? 

OTF_drive_cmap2 (otf, &gstring, 3, 1);

// OK, so what's the result of this? Let's see:

for (i=0; i < numcodepoints; i++)  {
	
	printf("Unicode character %ld maps to GLYPH IDENTIFIER %ld \n", gstring.glyphs[i].c, gstring.glyphs[i].glyph_id);
	
}

//The output is:

/*

Unicode character 1581 maps to GLYPH IDENTIFIER 340
Unicode character 1614 maps to GLYPH IDENTIFIER 907
Unicode character 1585 maps to GLYPH IDENTIFIER 290
Unicode character 1614 maps to GLYPH IDENTIFIER 907
Unicode character 1603 maps to GLYPH IDENTIFIER 395
Unicode character 1614 maps to GLYPH IDENTIFIER 907
Unicode character 1575 maps to GLYPH IDENTIFIER 257
Unicode character 1578 maps to GLYPH IDENTIFIER 322

*/

// Next, we'll call OTF_drive_gdef (otf,  gstring) whose job it is
// to tell us what TYPE of glyph (called the Glyph Class) are we dealing with. This is the OpenType
// GDEF table which can be used to allocate an identifier (Glyph Class) to each glyph
// in the font. 

// See http://partners.adobe.com/public/developer/opentype/index_table_formats5.html
// Glyph Class 1 = Base glyph (single character, spacing glyph)
// Glyph Class 2 = Ligature glyph (multiple character, spacing glyph)
// Glyph Class 3 = Mark glyph (non-spacing combining glyph)
// Glyph Class 4 = Component glyph (part of single character, spacing glyph)

OTF_drive_gdef (otf,  &gstring);

// Let's see what we got from that:

for (i=0; i < numcodepoints; i++)  {
	
printf("Unicode character %ld maps to GLYPH IDENTIFIER %ld which is Glyph Class %ld\n", gstring.glyphs[i].c, gstring.glyphs[i].glyph_id, gstring.glyphs[i].GlyphClass);
	
}

/*
Unicode character 1581 maps to GLYPH IDENTIFIER 340 which is Glyph Class 1
Unicode character 1614 maps to GLYPH IDENTIFIER 907 which is Glyph Class 3
Unicode character 1585 maps to GLYPH IDENTIFIER 290 which is Glyph Class 1
Unicode character 1614 maps to GLYPH IDENTIFIER 907 which is Glyph Class 3
Unicode character 1603 maps to GLYPH IDENTIFIER 395 which is Glyph Class 1
Unicode character 1614 maps to GLYPH IDENTIFIER 907 which is Glyph Class 3
Unicode character 1575 maps to GLYPH IDENTIFIER 257 which is Glyph Class 1
Unicode character 1578 maps to GLYPH IDENTIFIER 322 which is Glyph Class 1
*/

// OK, that's the end. Time to get out of here.
// Let's be tidy!

free(gstring.glyphs);
OTF_close (otf);

return 0;

}

Searching for Arabic text in UTF-8 encoding using PCRE

A simple example to get you started

Based on code generated by the superb RegexBuddy software (the price is great value!), here’s a simple example of using the PCRE regular expression library to search a UTF-8 text buffer for strings of Arabic text. The actual regular expression is very simple: ([\\x{600}-\\x{6FF}]+) – it just looks for sequences of Unicode codepoints from 600 (hex) to 6FF (hex). Not a particularly efficient function but it works – e.g., should calculate buffer length once etc.

I used code like this in an Arabic text pre-processor I wrote for working with XeTeX: saving Arabic strings to a file (from XeTeX), processing the text and reading it back in via \input{...}. Special effects not directly possible in XeTeX can be achieved by a pre-processing step. Yep, involves lots of \write18{...} calls. For sure LuaTeX offers many other possibilities but XeTeX’s font handling (and use of HarfBuzz) are very convenient indeed!

// Called with a buffer containing UTF-8 encoded text
void runpcre(unsigned char * buffer)
{

int wordcount;
pcre *myregexp;
const char *error;
int erroroffset;
int offsetcount;
int offsets[(1+1)*3]; // (max_capturing_groups+1)*3
unsigned char *res;
wordcount = 0;

myregexp = pcre_compile("([\\x{600}-\\x{6FF}]+)",   PCRE_UTF8|PCRE_UCP  , &error, &erroroffset, NULL);
if (myregexp != NULL) {
	offsetcount = pcre_exec(myregexp, NULL, buffer, strlen(buffer), 0, 0, offsets, (1+1)*3);
	while (offsetcount > 0) {
		// match offset = offsets[0];
		// match length = offsets[1] - offsets[0];
		if (pcre_get_substring(buffer, &offsets, offsetcount, 0, &res) >= 0) {
			
			wordcount++;
			// Do something with match we just stored into res
			// process_string could be what ever you want to do with the Arabic test string
			process_string(res, wordcount);   
		}
		offsetcount = pcre_exec(myregexp, NULL, buffer, strlen(buffer), offsets[1], 0, offsets, (1+1)*3);
	} 
} else {
	// DOH! Syntax error in the regular expression at erroroffset
}

}